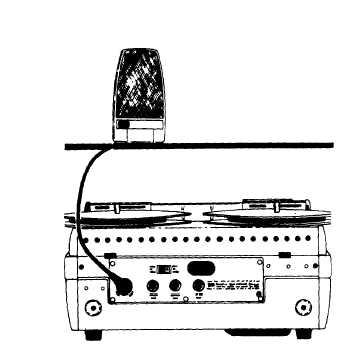
Figure 7-20.-Rear panel.
no effect when the recorder is in
mode.
287.32(M1)
the PLAY
INPUT JACK.—The input jack can be used
to connect a microphone or radio/phono com-
bination to the recorder. The proper input cir-
cuit is automatically selected by means of a
different plug length for each application. A
short (1-inch, 25-mm) plug is used with the
microphone and a longer (1-3/16 inch, 30-mm)
plug is used for the radio/phono connection.
EXTERNAL SPEAKER JACK.—An exter-
nal speaker can be connected to the recorder by
means of this jack, The nominal impedance of
the speaker should be 8 ohms, but speakers of
impedance ranging from 3.2 to 16 ohms may be
used with only a slight loss of power. Accessories
such as headphones may be used. The internal
speaker of the recorder is automatically discon-
nected when a plug is inserted into the external
speaker jack.
PREAMP OUTPUT JACK.—This jack is
provided for direct connection to the playback
signal to an external audio system, bypassing the
output stage of the tape recorder.
STEREO PREAMP JACK.—This jack is
found only in models that play back prerecorded
stereo tapes. The lower channel of a prerecorded
stereo tape is fed out through the stereo preamp
jack to an auxiliary amplifier and speaker
system.
POWER CONNECTION.—The connection
for the recorder power cord is located on the
rear control panel. The recorder may be con-
nected to a power source of 105- to 120-volts,
60-Hz, alternating current.
Recording
For clean, cool operation, place the recorder
on a hard, smooth, sturdy surface when
operating. Connect the tape recorder to the
power source indicated on the back panel of the
recorder by using the power cord provided.
Make sure the high-speed lever is in the center of
the neutral position, then turn the recorder on
by turning the tone control a few degrees
clockwise.
THREADING THE TAPE.—Press the stop
key. Remember that this brakes the spindles and
creates a condition to hold the tape away from
the play-record head. Place the full reel of tape
on the left spindle and the empty reel on the
right. Thread the tape so that the glossy side is
out and the dull, oxide-coated side faces in and
is against the heads. To thread the machine, pull
a length of tape off the supply reel and lower it
into the threading slot. Attach the end of the
tape to the empty takeup reel. Be sure that any
adhesive tape is removed if you are threading a
new tape. Otherwise, when rewinding the tape,
the end may stick and cause tape breakage.
When the tape is attached to the takeup reel, set
the index counter to zero for reference.
RECORDING WITH A MICROPHONE.—
To record from a microphone, make the
recording hookup as illustrated in figure 7-20.
You will notice that the microphone plug is
inserted firmly into the input jack at the rear
7-39


