button on the remote control to put the first
slide into viewing position.
Center and Focus.—Center and focus the
projected image on the screen. Do so by turning
the elevation wheel to elevate the projector to
the desired position. Level the projector, if
necessary, to align the image on the screen.
Obtain a sharp focus by rotating the focus knob
back and forth to focus the picture on the
screen. You may also focus the picture on the
screen by using the focus level on the remote
control.
Automatic Timer.—Set the timer for the
type of presentation. For example, if the projec-
tor is part of a display, the automatic timer can
be used to advance the slides; but the manual
setting is better if a speaker is present or if an AV
assistant is available to help in the briefing.
Long-run
Applications.—Allow
for
unrestricted flow of air to the projector open-
ings. If the projector is used in a window display
or in a cabinet, be sure to provide an adequate
outlet for the warm air expelled from the rear
grill vent. In some applications, additional ven-
tilation may be needed. The air circulating
through the projector should be as dust-free as
possible. Ample cooling results if cool air is
available to the projector. Normal room temper-
atures are adequate.
Emergency Slide Tray Removal.—If the
slide-changing mechanism should become inop-
erative because of a defective slide or some
foreign object, switch the automatic timer to M
(manual). Turn the slotted tray removal screw in
either direction, as far as it will go, to retract the
tray lock. While holding the screw in this posi-
tion, lift off the slide tray. Because the slide tray
has been removed in this manner, the lock on the
bottom of the tray is no longer engaged by the
notch in the metal slide retainer. With the tray
placed upside down, turn the retainer until the
lock engages the notch in the retainer; then
remove the defective slide from the projector by
pushing the SELECT button. Replace the tray
on the projector.
287.27(M1)
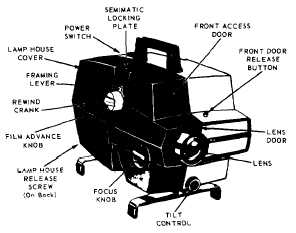
Figure 7-14.—Filmstrip projector.
Filmstrip Projector
The filmstrip projector shown in figure 7-14
is the Bell and Howell Autoload, Model 745A.
The function and operation of this projector is
similar to that of the many different types of
filmstrip projectors currently in use in audio-
visual facilities.
The model 745A filmstrip projector accepts
standard 35-mm filmstrips and adapts to
2- x 2-inch (50- x 50-mm) slides. Here we are
concerned with its function as a filmstrip projec-
tor. Figure 7-14 illustrates the important parts of
this projector.
SETTING UP THE PROJECTOR.—Place
the projector on a firm stand or table. Slide the
front lens door open. Attach the power cable to
a proper outlet and be sure the ground cable is
attached to the outlet.
LOADING THE CARTRIDGE AND PRO-
JECTOR.—Grasp the filmstrip by the end and
tighten the film into about a 1-inch (2.54-cm)
diameter roll. Open the door of the cartridge,
and position the film so that the leading edge
feeds through the top opening of the cartridge.
To load the projector, open the lens door by
pressing the release button on the front of the
projector. Pull open the access door. Pull the
hinged cartridge lock down and away from the
7-24


