To reinstall the fuse, follow the reverse opera-
tion. Never replace a fuse with one of a different
rating from that of the fuse supplied with the
projector.
There are no fuses in some of the current
projectors. In these models, the amplifier circuit
is protected with a resistor that will burn out
only in case of component failure. The resistor
protects the amplifier from further damage. If
the resistor burns out, this is an indication that
the amplifier should be checked thoroughly.
The preceding sections gave you some of the
simple maintenance information that, as a pro-
jector operator, you should know and be able to
apply. Perhaps there are other simple main-
tenance operations that you will perform. When
more complicated maintenance is required,
return the equipment to the place of issue and, if
possible, exchange it for serviceable equipment.
If your command has the capability to overhaul
the equipment, turn it in to your own repair
section. When your command lacks a main-
tenance capability, turn the AV equipment in to
the base AV library, or to a contract mainte-
nance organization.
8-mm Motion Picture Projector
In our discussion of motion picture projec-
tors, we have already covered a 16-mm projector
representative of the many types currently in
use. Here we cover the 8-mm projector. It is also
representative of the many varieties of cartridge
projectors, both 16-mm and 8-mm, that are in
use today.
CHARACTERISTICS OF THE 8-MM
PROJECTOR.—The cartridge 8-mm motion
picture projector provides fully automatic pro-
jection of super 8-mm sound or silent film. The
projector featured in our discussion is illustrated
in figure 7-17 with its important parts noted.
This projector is the Kodak Supermatic 60,
manufactured by the Eastman Kodak Company.
The projector weighs 29 pounds (13 kg) and is
capable of projecting super 8-mm film in car-
tridges ranging in size from 50 feet (15 m) to 400
feet (122 m). The projector projects films at one
of two speeds, 18 frames per second (fps) for
silent films or 24 fps for sound films. It contains
an all transistorized amplifier and utilizes a
magnetic playback head to reproduce the sound
from 8-mm film equipped with a magnetically
stripped sound track. The projector has a
built-in screen for individual viewing or may be
utilized with an external screen for group view-
ing. Whereas most cartridge projectors use con-
tinuous loop films, this model is equipped for
automatic threading and rewinding. Any super
8-mm film may be loaded directly from the reel
into one of the four available cartridges.
SETTING UP THE PROJECTOR.—To set
up this 8-mm projector, you first set it upright
on a firm table or stand and unwind the power
cord. It has a three-pronged plug which is
inserted in a 110- to 120-volt 60-Hz, alternating-
current outlet. Set the projector in a horizontal
position with the controls toward you.
Pull back on the screen cover latch, figure
7-17(3), and raise the screen cover (18). Push the
spindle (2) to the right and move it into the cor-
rect position for the cartridge you are to project.
In some cartridge projectors the cartridge is
simply inserted into the slot provided in much
the same manner as you would insert a cartridge
tape into a tape player. Seat the cartridge on the
spindle and close the screen cover if you are
using an external screen. The lens provided with
the projector gives a 6- x 8-inch (15-cm x 20-cm)
image on the built-in screen and is not recom-
mended for use with an external screen. Consult
the lens, distance, and screen chart for the
proper screen and lens. This chart is provided
with each projector.
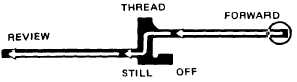
After raising the elevation cover, figure
7-17(13), follow the slot with the master control,
shown in figure 7-18, from OFF to STILL.
Center the projected image on the screen by
Figure 7-18.—Master control.
7-33